Bob pants in Linen by Ali

Over the last two years, in and out of lockdowns, I’ve loved digging into the Instagram sewing community for headspace and inspiration. In that time, one item has bumped its way to the top of sewists’ wishlists... elasticised pants. Style plus comfort, amen! So when I locked eyes on versions of Style Arc’s Bob Woven Pants made by two of my Instagram favourites @maeandbjorn and @m_o_l_l_y_m_o_l_l_y, it was decided. I wanted to give Bob a try!
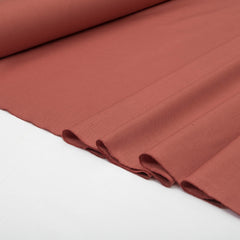
The fabric I selected was this gorgeous linen-cotton blend from de Linum. The colour is Marsala. It speaks perfectly to my recent love affair with rust, orange and brown tones. Admittedly, I did have trouble choosing from such a wide selection of beautiful fabrics! However, with some sage advice from Jo from the de Linum team, I landed on this medium-weight beauty. It’s has a good balance between stability and drape that works well for Bob’s signature balloon shape.

The Bob Woven Pants pattern is labelled as suitable for beginners. There are only 4 pattern pieces and some elastic, so it’s a relatively simple make! However, as a short person (5’2”), I already knew I’d need to make some modifications. A quick search of #bobpants on Instagram also warned me that this sewing adventure might not be so straightforward. Several makers described fit issues like “flappy pockets” and “nappy-bottom” that I knew I wanted to fix. Others noted that the instructions were minimal and hard to follow. Overall, I’d recommend this pattern for advanced beginners who can manage simple pattern adjustments and don’t mind finding techniques elsewhere when instructions are lacking!

I started by tracing out my pattern to preserve the original. My current measurements are W 76 cm, H 96 cm, so I selected a size 10. I’d never used Style Arc patterns before, but I appreciated that the pattern lines are different colours - it made it very clear to me which lines to trace!

Next, I modified the pattern pieces. I shortened the legs by 3 cm, to account for my petite stature. I estimated this by measuring from my crotch down the inside of my leg and comparing this to the inseam of the pattern. I also prefer high-waisted pants over mid-rise. I estimated I’d need to add another 3.5 cm to the rise to achieve this.
I’d seen comments that Bob pants often need a little lengthening in the front crotch. I extended the crotch of the front piece by 1 cm. I also drew a new line up the back centre seam, taking out 1.5 cm to help reduce the “nappy-bottom” effect at the back of the pants. I was careful not to take too much, so the pants could still be pulled up over my hips, and also take 3cm off the edges of the waistband to account for the change.

I also re-shaped my pocket pieces so they’d line up with the top of the pants and be secured in the waistband. This makes sure the pockets don’t flap around or create bulk at the sides of the pants. Because the pattern pieces were a bit larger, they didn’t fit in my cutting layout for 1.3 m fabric anymore. I solved this by piecing together my pockets from larger scraps, with the seams hidden inside the garment.
After cutting out my linen, I overlocked the edges of all my pieces to prevent fraying. Then on to construction!
Style Arc’s method for pocket construction works fine, but not for my new pocket shape. Instead, I sewed the pockets using the same technique as the Peppermint Magazine x elbe textiles Wide-strap Maxi Dress pattern. I recommend trying this method if you also alter your pockets like this.

I then sewed the pant legs as per the original Style Arc instructions. I tried on the pants to see where the waistband would sit and at that point decided I’d increased the rise of the pants too much. I reduced the rise by 1.5 cm before moving on to the waistband.
I attempted the Style Arc instructions for the waistband but found it too fiddly and ended up unpicking it all. Instead, I sewed the waistband on without the elastic and left a gap to thread the elastic through afterwards. Much easier!
Trying the pants on again, I was happy with the fit at the front but found the pants bulged unattractively at my lower back. Pulling the excess fabric up towards the waistband seemed to improve the fit, so I pinned up the excess to check and it looked a lot better.
I unpicked and re-sewed the waistband to remove this excess fabric - about 3 cm at the back centre seam, curving up to meet the original waist-line toward the side seams. Much better. Popped in a Kylie and the Machine label too!
Finally, hemming the pants. With my original adjustments, the finished pants were sitting at full length on me. However, I decided I wanted a more cropped look to show off ankle boots or fun socks. I took another 7 cm off the length and am super pleased with the result!

I’d say this is a “quick sew”, but took me a few hours longer due to fiddling with the pattern and figuring some things out myself. Next time I make a pair of Bobs, I think it’ll just take me an afternoon.
Overall, I’m really happy with how this project turned out! I work in the education space, so having garments that are professional but comfortable, with quirky or fun elements is important to me. These Bob Pants fit the bill with their chic shape, and I can easily dress them up or down. The linen that I used was a pleasure to work with and sturdy enough to handle some unpicking as I worked towards my final fit. It has a gorgeous finish! It’s a garment ready for whatever life or lockdowns have to throw my way.

Alison @open_hear_sutra
Fabric Suggestion

-
Posted in
bob pant, linen, projects, sewing, Sustainable fashion

